Two days are needed for strength training exercises. In this video, Mercola trainer Justin Check will be walking you through strength training exercises:
You will perform two sets per exercise, doing about 10 to 15 repetitions, with the last three reps crucial for reaping benefits. You need to increase weight in the smallest increment possible. Lift until you reach muscle failure and you feel you can't lift anymore. For Day 2 of your strength training, check out this detailed video:
As for your tempo, make sure you lift slowly as follows: three-second positive, one-second isometric squeeze, three-second negative. Don't just concentrate on moving from point A to B. Focus on contracting your muscles through the entire range of motion.
The tempo of your repetitions is very important. If you go to the gym, you might see several individuals doing their weight lifting a little too fast. By doing this, the tension created by the lifting can wind up in the wrong area of your body and increase your risk of injury.
Why Should You Squat More?
Squats are relatively simple to perform and can be done anywhere without special equipment. If you’re looking for an exercise that may promote important bodywide benefits, squats are ideal because they can help:
- Increase your body’s nitric oxide (NO) production
- Build muscles throughout your body
- Tone your ab and glute muscles
- Burn more fat
- Improve mobility and balance
- Reduce risk for athletic injuries
- Enhance insulin sensitivity
- Promote body waste removal and efficient nutrition delivery to tissues
To perform squats safely and effectively, follow these steps:
- Warm up first.
- Stand with your feet hip-width apart, feet parallel, toes pointing forward and the weight of your body distributed evenly between your heels and the ball of your foot.
- Keep your back in a neutral position, and your knees centered over your feet.
- Inhale and slowly bend your knees, hips and ankles, lowering until you reach a 90-degree angle. Make sure your quadriceps are engaged. Your behind should move back as though you're about to sit in a chair, while your arms move forward slightly for balance. You can do a shallower squat if you have knee or back pain.
- Raise yourself back up to starting position as you breathe out. Repeat 15 to 20 times.
Planks, Pushups and Plank to Pushup
Planks and pushups are examples of effective, full-body exercises that you can do virtually anywhere. Planking involves holding your body off the ground in a stiff, straight line. Your lower back should not sag, and you should keep your knees straight and your abs tightened. Pushups share some commonalities with planks, including keeping your body stiff and straight during the exercise. In fact, planks are sometimes described as a pre-pushups.
If you're wondering which is better, planks or pushups, it's like comparing apples to oranges. You're best off including both of them in your workouts. If you want some variation at this level, though, you can try a plank to pushup, which combines the two exercises, giving you the benefits of both. Here’s how to do it:
- Start off in a plank position.
- Lower yourself into a pushup position.
- Push back up into a plank.
A plank to pushup may look extremely challenging and exhausting, but this combo may help you strengthen your core muscles and boost upper and lower body strength by targeting shoulders, arms and core muscles.
Don’t feel strong enough to do pushups? You can try building your strength by practicing planks first. Do them for 30 seconds to one minute. Once you have enough strength, you can move on to doing standard pushups, and ultimately plank to pushups.
What Are the Health Benefits of Resistance Bands?
If you have resistance bands at home, you can add them to your strength training at this level. These low-cost bands, which are made of strong and thin rubber and have handles on each end, can be used by anyone ranging from beginners to advanced athletes.
There are different types of resistance bands, including therapy bands, compact or fit tube resistance bands and lateral resistance bands. Using these different types will help you target different muscles easily, like the legs, hips, glutes and arms.1 These bands also come in various resistances so you can choose one that suits your current fitness level and just increase the difficulty once your strength improves. Some of the health benefits that you can get from adding resistance bands to your routine include:
- Building muscular endurance2
- Improving performance and strength3
- Enhancing mobility, agility, coordination and flexibility4
- Assisting in functional muscle movements development5
In addition, resistance bands help promote changes in movement velocity, help your muscles adapt to change and may minimize your risk of falls and other injuries by helping boost your functional strength.6, 7 They may also help activate more muscles and neurons during a workout by targeting different areas and facilitating movement through four planes.
Resistance bands are portable, so you can use them to perform a comprehensive and full-body workout anywhere you want. They can be safely used on their own too, so you don’t need to worry if you can’t exercise with your workout buddy.
Some Tips When Using Resistance Bands
While resistance bands are typically safe to use during workouts, there may be some instances where they can cause discomfort or minor injuries. Here are some tips you can heed to lower these risks:8
- Double-check your resistance bands for cracks, tears, punctures or weak spots — This will lower the chances that your resistance bands might break during a workout or disconnect from the handles.
- Use resistance bands when you’re working out on carpets, wooden floors or any surfaces that are not rough — Rough surfaces might damage resistance bands and make them brittle in the long run.
- Secure the resistance band tubing before exercising — Make sure that the resistance band tubing is properly anchored beneath your feet before starting with your workout.
- Keep resistance bands in storage away from direct sunlight or high-temperature places — Exposure to hot temperatures and harsh chemicals, such as chlorine in pools, may compromise the strength of resistance bands, which may cause breakage leading to injuries.
Chest and shoulder presses, rows, bicep curls, triceps extensions, squats and pushups are just some of the moves you can do with resistance bands. Performing any of these resistance band exercises allows you to work on and challenge almost every major muscle group in your body, and aids in improving your stamina, flexibility, power and range of motion.
Take Note of the Correct Way to Do a Pushup
There’s more to pushups than just showing off your figure, form and physical strength. Researchers at Harvard University’s School of Public Health discovered that the number of pushups you can complete appears to be an accurate way to gauge your heart health, as well as your fitness level. They found that men who were able to complete more than 40 pushups at the start of the study had a 96% reduced risk of cardiovascular events, compared to those who could do less than 10 pushups.
Some members of the Mercola staff participated in a pushup challenge, where they had to do as many pushups as they could in three minutes.
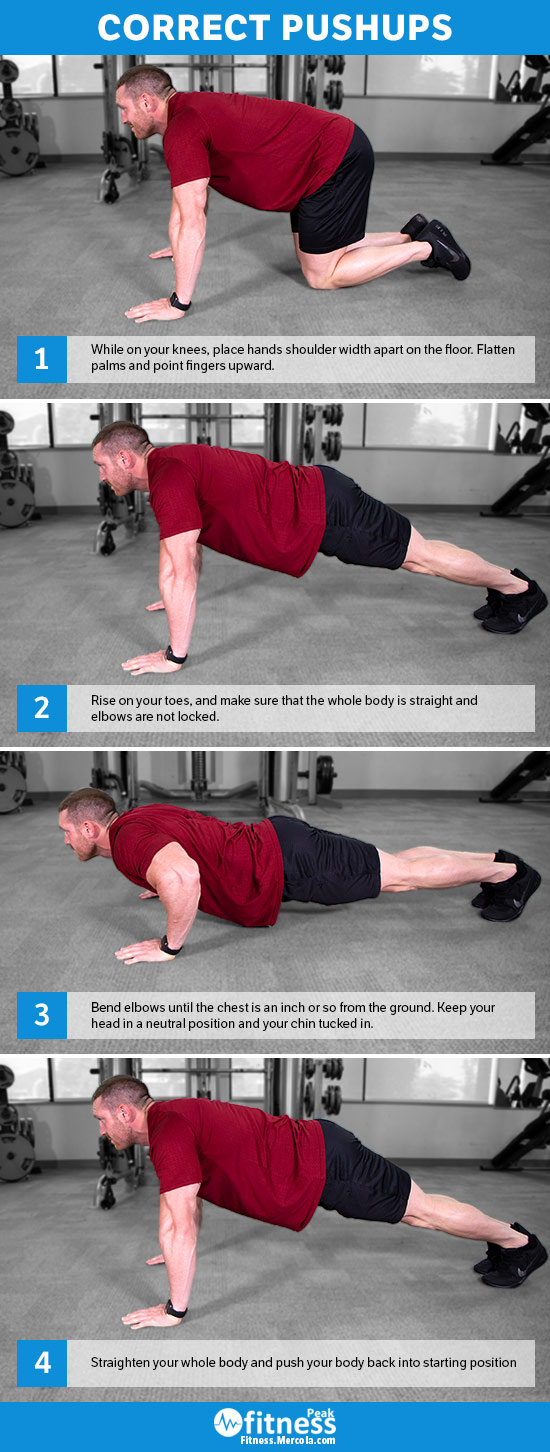
Before you get too excited about performing pushups, take note of these instructions on how to properly do this move to reduce your risk for injuries:
- Get on your knees and place your hands shoulder-width apart on the floor. Flatten your palms and point your fingers forward.
- Keep your toes on the floor and your elbows straight, but not locked. Your knees, hips, back and shoulders should also be kept straight.
- Bend your elbows until your chest is an inch or so from the ground. Make sure your head remains in a natural position with your chin tucked in. Look no more than 6 inches in front of your body to help keep your head and neck in the correct position.
- Straighten your elbows and push your body into the starting position. Your knees, hips and back should be straight and aligned.
Graphic: How to do a correct push up:
How to Do Situps With a Medicine Ball
A situp is a bodyweight exercise where you lie down on the floor and curl your torso toward your thighs by using your rectus abdominis muscle. Its aim is to strengthen your entire core and improve your lower back strength.
You may be doing situps as part of your regular exercise routine, or may have done them in the past. But if you want to make them more challenging, using a medicine ball is a good idea. The purpose of a medicine ball is to help activate other muscles that are not otherwise used during normal exercise. They are typically sold in various weights and sizes, so pick one that you can comfortably handle while doing situps.
Due to the weight of the ball, this is an advanced form of a situp, so a high level of physical fitness is required for this exercise. To do a situp while using a medicine ball:
- Lie down on the floor with your back straight and your knees bent to 90 degrees.
- Place the medicine ball on top of your chest and hold it firmly.
- As you raise your torso, keep the ball on your chest, crunching toward your knees.
- Pause and then return to the original position.